Traverse Global v11.2 - Service Repair
Work Order Entry
The Work Order Entry function is the workhorse of the Service Director system - it records new service calls, schedules dispatches, tracks labor and parts used to complete the work order, and invoices completed work orders.
Select Work Order Entry from the Work Orders menu, then use the fields at the top of the screen to enter or edit basic information. Use the Site Information and Dispatch tabs to record site, billing, dispatch, equipment, and other information for the service call.
| Select | To |
|---|---|
| Referral | Add a customer referral to this work order. |
| Copy | Allows you to copy work order information from another work order. |
| Gives you the option of printing an online work order or the invoice associated with the current work order. The work order must have at least one dispatch with a complete status before you can print an online invoice. Once you print an invoice online, you will no longer be able to reopen the dispatch and edit the Work Order/Dispatch if you have the SD business rule to allow editing after online invoice set to 'No'. To allow editing, set the business rule to 'Yes', or use the prepare/edit invoices process to delete the prepared invoice. For information regarding applying external payments to the online invoice, see the SD Work Order Entry section of the TPS Overview. | |
| Validate Address | Enables you to validate the address for tax calculation. Upon successful validation, the Valid Address checkbox will be selected, indicating that the address has been successfully validated. |
| Search Email | View the emails to and/or from the vendor or customer or other record selected, searching for the email address on the General tab. You must have the Message Tracking Setup in System Manager completed to use this function. |
| Attachments | Enter comments or attach documents relating to this work order. See Attachments for more information. |
Click the New button to open a blank work order record. The system will generate a new work order number if this is a new work order.
If you want to edit a work order, select one from the Order No. drop-down list.
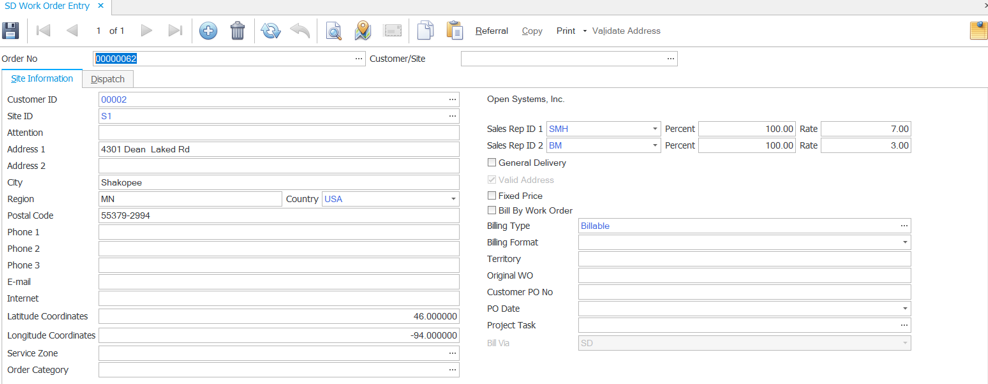
- You can search for a customer by selecting an address from the Customer/Site drop-down list. When you select an address, the customer information fills in.
-
- Select a ship-to address from the drop-down list as the Site ID for this work order. You may see a notification dialog box:

This dialog box allows you to utilize the sales rep information in the ship-to entity of Traverse for commission purposes. Choose Yes if you want to assign the Ship-To sales rep information to the work order; otherwise, select No.
- These fields display information for the customer you selected in the Customer ID field. Any changes you make to the location information will only apply to the current work order; it will not change the master location record.
- Attention: the name of the contact listed in the customer information
- Address 1 and Address 2: the address for the selected customer
- City, Region, and Postal Code: the city, region, and postal code for the selected customer
- Phone, e-mail, and Internet: the phone number(s), e-mail address, and Internet website for the selected customer.
-
Enter the Latitude Coordinate of the customer region.
-
Enter the Longitude Coordinate of the customer region.
The Vaild Address check box will be selected once the address is validated.
-
Select the General Delivery checkbox to initiate address validation, with minimal information (Region and Postal Code).
- Accept or select the Service Zone that covers the area where the site is located. The Service Zone for a new work order will default in according to the address of the site information currently displayed. For example, if using postal codes to determine service zone, the postal code on the Customer/Site ID selected will determine the default Service Zone for this new work order.
- Select an Order Category for the order.
- The sales rep(s) from the Sales Rep ID 1/2 field(s) displays the sales representatives if you chose to assign the Sales Rep Info from the Ship-To address. Each sales representative can receive up to 100 percent of a sale.
- The Percent field(s) will display the commission percentage(s) for the sales rep(s), but you may change it. Each sales representative can receive credit for up to 100 percent of a sale.
- The Rate field(s) will display the commission rate(s) for the sales rep(s). You may change the rate in this field.
- Mark the Fixed Price check box if this work order will be billed with a fixed price. When you bill fixed prices, the system bills labor and parts line items according to the estimated quantities or units used for the dispatch (as noted in the Qty Estimated and Units Est boxes on the Dispatch tab), not according to the actual amounts used.
- Mark the Bill by Work Order check box if this work order will be billed by work order. Use this option if you want all dispatches on the work order to be completed before you can print an invoice. Clear the box to print invoices for individual dispatches as each is completed.
- Select the Billing Type for this work order from the drop-down list.
- Enter or select the Billing Format for this work order, if applicable. To change the billing format from the default invoice format, you must use the Design Studio to modify the existing Service Director invoice form and save the corresponding form to the database.
- The Territory field displays the territory listed in the customer record you selected.
- Enter the original work order number in the Original WO field, if applicable.
- Enter the customer's purchase order number and PO date that corresponds to this work order, if applicable, in the Customer PO No and PO Date fields.
- You can tie the work order to a current project by selecting the project from the Project Task drop-down list.
- In the Bill Via field, select whether you want to bill the work order through Service Director or Project Costing. This is only applicable if you have selected a Project Task. See Service Director link to Project Costing for more information regarding billing via SD or PC.

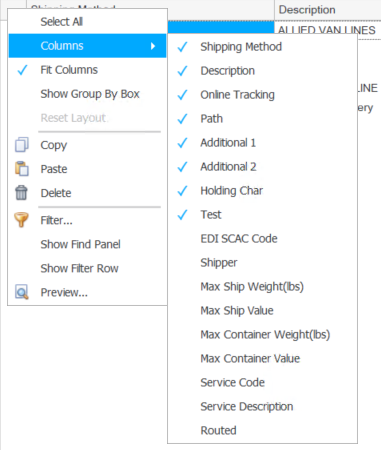
You can hide or show columns in the grid by right-clicking on the upper left corner of the grid and selecting the fields to show or hide from the Columns submenu.
Note: You cannot add a new dispatch if Bill by Work Order is marked on the Site Information tab, and if the work order has a billed or posted dispatch.
- Click the Append button (
 ) in the Dispatch section, to open a new dispatch record. The dispatch number is generated by the system.
 - Enter a description for the dispatch in the Description field.
- Select the equipment ID this work order applies to from the drop-down list in the Equipment ID field.
- The Status field will default to 'Request Received' when a new dispatch is created. Select a different status from the drop-down list if applicable.
- Request Received - When the dispatch is entered and nothing has been done to the dispatch yet.
- Billed - The dispatch has been scheduled, transactions have been entered for the dispatch. and the invoice has been printed after the Prepare Invoices function is run.
- Canceled - The dispatch has been canceled.
- Reopen - A canceled dispatch has been reopened.
- Posted - A billed dispatch has been posted using the Post Work Orders function.
- Completed - The dispatch has been billed and posted, and is now completed. The status gets changed to 'Completed' when you select the Complete button and enter the completion information
The status may be changed to 'Completed' prior to billing and posting if nothing is being billed to the customer.
Note: The status of the dispatch is based on system updates and selections made from the Activity Status button menu.
- The Billing Type field will default to the value selected on the Site Information tab. Select a different billing type for the dispatch if applicable.
- Enter the estimated travel time in hours in the Est Travel (Hrs) field.
- The total estimated time for the dispatch in hours displayed in the Est Travel (Hrs) field is the sum of the estimated travel time and the work to do IDs for the dispatch.
- Accept or edit the Priority level for the dispatch. The Priority field allows you to set a priority for the order. You can assign a default priority level via the SD Business Rules. This field is for information only. Note: Use the Column Chooser to show the Priority column in the grid, if necessary.
- Press the Enter key or the Tab key to add Work To Do detail. If the work to do detail rows do not appear, a plus sign (
 ) will appear next to the dispatch number. Click the plus sign to add work to do IDs to the dispatch.
 - Select a work to do ID from the drop-down list in the Work To Do ID field. The Description and Required Skill Level fields should display the information from the work to do record.
- Enter the estimated time to perform the work to do in hours in the Estimated Time (Hrs) field.
- Repeat Steps 9-11 for each work to do ID you want to add to the dispatch.
- To finish changes to the dispatch, click the End Edit button (
 ).
). - Click the Save button on the toolbar to save your work.
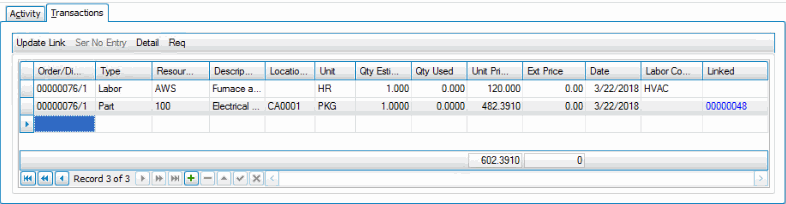
Transactions tab
Use the Transactions tab to determine whether a work order dispatch should have activity added, including part costs, freight costs, or labor resources.
Transactions allow you to track your expenses and billable items on a dispatch. These lines belong to the selected dispatch, allowing you to generate unique labor and parts lists and record dispatch completion details. The information on Transactions tab is then used to create invoices.
If Service Director interfaces with Inventory, part quantities update IN on-hand quantities online. Posting billed work orders updates dates, summary and detail history, and serial/lot information.
NOTE: Transactions may also be entered using the Transactions button on the Dispatch tab. Using the Transactions button will open the Transactions function.

- Click the Append button at the bottom of the tab to add a record.
- Select the type of transaction you are adding from the Type field drop-down list: Labor, Part, Freight, or Misc.
- The Order/Dispatch will fill in automatically from the work order you are working with and the dispatch you selected.
- If applicable, select a Resource ID from the drop-down list. The drop-down list shows technicians if you are adding a labor transaction, or parts if you are adding a part transaction. This field is disabled for Freight and Misc types.
- Enter a description into the Description field. If the resource is a part, the item description will display in this field; otherwise enter a description.
- If you selected a part in the Resource ID field, select a location from the Location ID field drop-down list. Otherwise, the field will be blank. This field is disabled for Freight and Misc types.
- The Unit field will display the units of measure for the part selected in the Resource ID field, or the value 'HR' if labor is selected in the Type field. This field is disabled for Freight and Misc types.
- Enter the estimated quantity of the part or labor into the Qty Estimated field. This field is disabled for Freight and Misc types.
- Enter the quantity used into the Qty Used field. This field is disabled for Freight and Misc types.
- If you selected 'Labor' or 'Part' in the Type field, the unit price displays in the Unit Price field. You may change the unit price. This field is disabled for Freight and Misc types.
- If you selected 'Labor' or 'Part' in the Type field, the Ext Price is calculated using the qty used and the unit price amounts. This field is disabled for Freight and Misc types.
- Accept or edit the transaction date in the Trans Date field. By default, this field will display the current date.
- If you selected 'Labor' in the Type field, select a labor code from the drop-down list in the Labor Code field.
- To include a freight or misc amount on the invoice, use the Column Chooser to bring the Ext Cost field into your grid, and enter the amount to be billed into this Ext Cost field.
- Save your changes.
Use the Toggle button ( ) to switch from Summary (grid) View to Detail (field) View. Use the Detail View to see additional information about the Dispatch.
Note: You cannot add a new dispatch if Bill by Work Order is marked on the Site Information tab, and if the work order has a billed or posted dispatch.

- Click the Append button () in the Dispatch section, to open a new dispatch record. The dispatch number is generated by the system.
- The Billing Type field will default to the value selected on the Site Information tab. Select a different billing type for the dispatch if applicable.
- Enter a description for the dispatch in the Description field.
- Select the equipment ID to which this work order applies from the drop-down list in the Equipment ID field. If you have the SD Notify Warranty/Contract business rule set to 'Yes', a notification window will appear if the site equipment has a warranty or contract associated with it. See the Warranty and Contracts screen for more information.
- The Equipment Description appears. Accept or edit the description.
- Select a Bill To ID as necessary.
- Accept or edit the Location ID, as applicable.
- Accept or edit the Priority level for the dispatch. The Priority field allows you to set a priority for the order. You can assign a default priority level via the SD Business Rules. This field is for information only.
- The Status field will display the current status of the dispatch.
- The Entry Date will default in, and cannot be edited.
- If the dispatch has been canceled, the Cancelled check box will be marked.
- If the dispatch has been put on hold, the Hold check box will be marked.
- Select a technician for the entire dispatch from the Requested Tech ID drop-down list, if applicable. Otherwise, you can select multiple technicians for the dispatch on the Transactions tab at the bottom of the screen.
- Enter the estimated travel time in hours in the Est Travel (Hrs) field.
- The total estimated time for the dispatch in hours displayed in the Est Travel (Hrs) field is the sum of the estimated travel time and the work to do IDs for the dispatch.
- Enter a date and time into the Requested Date and Requested AM/PM, as applicable.
- The estimated time to perform the work to do in hours will appear in the Total Est (Hrs) field.
- Enter the internal meter number in the New Counter field, if applicable. Examples of counters include the number of hours run, copies made, or pages printed. You can use these information-only numbers as diagnostic tools.
- Accept or select a Dispatch Number to which you want to assign work to do from the drop-down list, as necessary.
- Click the Append button () to add a new Work To Do record.
- Select a work to do ID from the drop-down list in the Work To Do ID field. The Description and Required Skill Level fields should display the information from the work to do record.
- Accept or edit the Estimated Time (Hrs) for the work.
- Repeat Steps 20-22 for each work to do ID you want to add to the dispatch.
- To finish changes to the dispatch, click the End Edit button ().
- Click the Save button on the toolbar to save your work.
Detail tab
Work To Do tab

Schedule a dispatch
- Click the Schedule command button to open the calendar. A Schedule Info window should appear. Note: If the customer's credit is on hold, or the customer's status is inactive, the calendar will not open.
- Select the Tech ID, Start Time, and End Time from the associated field drop-down lists. Use the Suggest button to have the system suggest a schedule for the dispatch.
- Click OK to set the time for the selected technician on the calendar. The calendar will open and display the scheduled dispatch. Close the calendar to return to the Work Order Entry function.
Record arrive/start time on a dispatch
- Click on a new line in the Activity section to start a new record.
- Select Arrive/Start from the drop-down list in the Type field. The workstation's current date and time will display in the Date/Time field. Change the date or time if necessary, and select the technician from the Technician ID drop-down list
- Select the Tech ID, Start Time, and End Time from the associated field drop-down lists.
- Click the End Edit button () to complete the entry.
Complete a dispatch
- Click the Complete command button to open the Complete window.
- Enter or Select the completion date and time from the Date/Time field drop-down list. This will default to the current date and time.
- Select the Technician ID from the drop-down list. This field will default to the technician listed for the Arrive/Start activity.
- Click the OK button to complete the entry. The dispatch status now shows Completed, and a Complete entry will appear in the Activity section of the Dispatch tab.
Add parts, labor, freight, or miscellaneous costs to a dispatch
You can add transactions directly to the dispatch via the Transactions tab at the bottom of the screen, or you can open the Transactions function by using the Transactions button on the Dispatch tab. The process you use to add transactions is the same. See the Service Order/Work Order Transaction Entry Overview for more information.
- Click the Transactions command button to open the Work Order Transactions function. To display all of the available fields, click the Toggle button (). Alternately, you can click the Transactions tab at the bottom of the Work Order Entry screen.
- Click the Append button to add a record. The work order number/dispatch line will display in the Order/Dispatch field of the new line.
- Select the type of transaction you are adding from the Type field drop-down list.
- If applicable, select a Resource ID from the drop-down list. If you selected Labor in the Type field, the drop-down list will show your technicians. If you selected Part in the Type field, the drop-down list will show field will show your parts.
- Accept or enter a description into the Description field. If the resource is a part, the item description will display in this field.
- If you selected a part in the Resource ID field, select a location from the Location ID field drop-down list. Otherwise, the Location ID field will be blank.
- The Unit field will display the units of measure for the part selected in the Resource ID field, or the value HR if Labor is selected in the Type field.
- Enter the estimated quantity of the part or labor into the Qty Estimated field.
- Enter the quantity used into the Qty Used field.
- If you selected Labor or Part in the Type field, the unit price displays in the Unit Price field. You may change the unit price.
- If you selected Labor or Part in the Type field, the extended price is calculated using the Qty Used and the Unit Price amounts. If you selected Freight or Misc in the Type field, enter a cost in the Ext Cost field.
- Select or enter a transaction date in the Date field. By default, this field will display the current date.
- If you selected Labor in the Type field, select a labor code from the drop-down list in the Labor Code field.
- Click the Save button on the toolbar to save your work.
Cancel or delete a dispatch
Note: You cannot delete a dispatch if the dispatch's status is Posted, Billed, or Completed, or if the dispatch has transactions.
- Select the dispatch you would like to cancel or delete.
- Click the Cancel command button to cancel the dispatch.
- A confirmation window will appear. Confirm the cancellation. A Cancel activity will be added to the Activity section of the Dispatch tab.
Reopen a dispatch
Note: You can reopen a dispatch if the selected dispatch status is Open, and the selected dispatch is canceled.
- Select the dispatch you would like to reopen.
- Click the Reopen command button to reopen the dispatch.
- A confirmation window will appear. Confirm the reopen action. A Reopen activity will be added to the Activity section of the Dispatch tab.

- Click the Append button () in the Activity section, to add a new activity entry to the dispatch record.
- Select a type of activity from the drop-down list in the Type field.
- The Date/Time field will default to the current date and time when a new activity is created. Enter or select a different date from the calendar control if applicable.
- If a technician will perform the activity, select a technician from the drop-down list in the Technician ID field.
- The Entered By field will display the name of the user who added the activity to the dispatch.
- Enter any notes for the activity in the Notes field.
- To finish changes to the dispatch, click the End Edit button ().
- Click the Save button on the toolbar to save your work.